Pages

Friday, October 12, 2018

No FBA for a while

Friends, I haven't blogged in a while.  In June I was diagnosed with breast cancer.  I am 43. I have no family history, and no genetic mutations for it.  But I got it.  It was found during a mammogram (which happened to be done 3 months earlier than "needed") This whole summer has been a cruel, unkind roller coaster of tests, biopsies, treatments, and decisions.

One week ago today I had a bilateral mastectomy.  Reconstruction will happen in a few months.  So...no FBA needed for me for a while.  I am completely deflated and extremely sore.

Pathology was good, I am stage I with no lymph node involvement. I'm still waiting on one final test to come back which will determine if I need any additional treatment.  Right now, I should not need chemotherapy or radiation.  Fingers are crossed.

Here is my outfit of the day:


Hair in braids to keep it off my neck.  I am not allowed to bring my arms above shoulder level.
Hubby's Hawaiian shirt: I need button down tops that are roomy to accommodate swelling
Post Surgical camisole, thankfully paid for by insurance
Lowes apron to hold surgical drains:  $1.50 at Lowes
me made pajama shorts

I feel better every day and have been relaxing and watching lots of TV guilt-free.

Seeing how October is Breast Cancer awareness month and all sorts of pink ribbon items will be popping up in stores, I ask you to take a minute and remember that almost all of these items are about capitalism, not cancer. In many cases, only pennies on the dollar go toward a charity. If you want to give money to help find a cure, donate to a reputable charity that funds research grants, rather than those that promote 'awareness.' Research will find a cure and the causes, not a tee shirt.

So friends, get a mammogram even if you are under 40.  Get a 3D mammogram-this should really be the standard, but isn't.  If you have a family history of cancer, do genetic testing-knowledge is power.  Be well.

Love, Meigan

Sunday, May 14, 2017

A Tennis Tote Bag!

I have been playing a lot of tennis lately and have been sewing up lots of tennis skirts and skorts.  Seeing what RTW tennis wear sells for, I am very glad I sew.  Little tiny skirts that don't even have pockets sell for $50 and up!!!  Nice tennis bags also sell for big $$.  I finally came to the realization that I needed to make one myself when I realized how much stuff I carry to the court: my racquet, water bottle, and small bag/purse--too much stuff!

I searched online, on Pinterest, and through bag and tote patterns, and wound up creating a bag combining several different bags and features, along with my own spin (namely on the interior).

Let me start by saying it would have been cheaper for me to buy one of the nice expensive bags I saw on Etsy, but I need projects in my life, and I get a lot of satisfaction out of making things myself.  

Features I needed the bag to hold:
  • 2 tennis racquets (one day I may own more than one and I wanted to be ready)
  • water bottle
  • 2 or more cans of balls
  • wallet & phone
  • sunscreen
  • sunglasses
  • keys
  • sweatbands, rosin, & sweat towel
Details I wanted:
  • Zippered interior pocket for wallet and phone
  • A clip on the back that I could use to hang the bag on the fence rather than putting it on the ground or on a bench.  
  • Light colored interior (much easier to find things inside!)
  • Dark colored handles - to hide dirt/grime
  • Lots of pockets to prevent me from digging through the bottom of the bag

My first prototype attempt was wider than tall, more like a beach tote, and I felt like I was carrying a small suitcase.  It was too floppy, too big, and it felt sloppy.

My second and final prototype switched up the dimensions to be taller than wide, so my racquet would be more upright, and not flop around.  

This is my final product:
Front view

Back View

I used 4 different outdoor polyester canvas fabrics and heavy duty pellon sew-in interfacing, all purchased at JoAnn.
Patterned Exterior Fabric #1: Covington Outdoor Canvas Caribe Hurley
Teal green Exterior Fabric #2: Solarium Outdoor Fabric -Rave Aqua
Interior Lining fabric: Waverly Outdoor Fabric SNS Sunburst Seaglass
Straps and trim were a navy blue outdoor fabric

To provide padding in the racquet pocket, I sandwiched in some white polar fleece between the interfacing and lining.  I didn't want to have to turn and press my seams, so I bound the edges of the pockets with self-made, navy blue bias tape.  I sewed it onto the right side, pressed, turned it over the raw edges, folded the raw edge of the bias tape under, pinned in place and top-stitched through all layers.

Bias Tape edge finish
I stiffened the bottom of the bag using a kids stiff plastic place-mat that I found on sale at my local big-box craft store.  I trimmed it to be ~1/2" smaller than the bag bottom and trimmed the corners.  I made a little pocket on the bottom piece so that I could slip the place-mat in and it wouldn't move around.  

For the hardware, I had a good collection that I had scavenged from my husband's beat-up old laptop bag: clips, rectangular rings, & tri-slides.  I had magnetic snaps and velcro in my stash.  The only things I needed to buy were the bag feet and popper snaps.  I used rectangular rings and a tri-slide to make an adjustable strap.    

Bag Feet
The interior is fantastic!  The beauty of making bags for yourself is you can customize the number and size of pockets to suit your personal needs.

Look at all of these pockets!!
Inside View!
  • I have a zippered pocket for my wallet and phone.  
  • 2 smaller pockets for sunscreen and my sweatbands
  • a key clip (also useful for hair elastics)
  • 2 large pockets that can hold ball cans or my sunglasses case
  • 2 large external side pockets that can hold ball cans &/or my water bottle
The top closes with a magnetic snap on small tabs.  I got that idea from the book "The Bag Making Bible" by Lisa Lam.

Top View

I used popper snaps on the sides to keep the bag smaller when less full and able to expand if needed.  

I absolutely love how this came out.  It was a big hit with my tennis team, and I've already told them, "No, I will not make you one--too much work!!"

Wednesday, May 10, 2017

New Jalie Loulouxe: Business in the front, Party in the back!

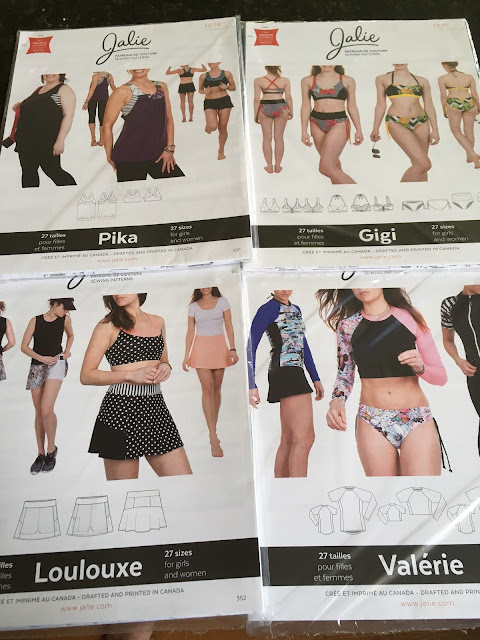
When Jalie released their most recent set of 13 patterns, I was SO excited I basically said "Jalie, take my money!" (and I don't go crazy on patterns).  I was able to restrain myself and only bought 4 new ones: Pika-sports bra and top, Gigi Bikinis, Loulouxe-skort, and Valerie-rash guards


I hesitated about purchasing the Valerie rash guard pattern since I have already modified the Jalie 3245 raglan tee to be used as a swim shirt.  What eventually convinced me to buy the Valerie was the color blocking opportunities and side panels.  Why make more work for myself in changing my own pattern when the fabulous ladies at Jalie have done it for me?

First up from the new patterns was the Loulouxe.  I joined a tennis team (beginner level) last fall and have been making tennis skirts using Jalie 2796 with altered pockets to fit tennis balls.  I love the flounce on the back of the Loulouxe, it is so swingy and it hangs beautifully.  My first version was made with an aqua activewear knit from Fabric Mart.


The seaming on the Loulouxe doesn't allow for ball pockets on the sides of the skirt, so I improvised:

I made ball pockets using Kwik Sew pattern 3341 View B (shorts):
I compared the location of the pockets on the KS shorts and transferred that location to the shorts of the Loulouxe.  They work well!

My next version was made with a peacock print spandex from Spandexworld.com 


Source: Spandexworld.com

To conserve fabric and to play up the tail-feathers aspect of my fabric, I made the front of the skirt black and kept the pattern on the sides and back.  


Flashback to the 80's:
This skirt is "Business in the front...."

"Party in the back!" 


One odd thing I noticed about the Loulouxe instructions was the final assembly which was different from the Jalie #2796 Multi-sport skort assembly.  The method for the Loulouxe would create an exposed seam next to your skin between the waistband and the shorts.  The multi-sport skort keeps that exposed seam between the shorts and the skort, and off of your skin.  I prefer the multi-sport way, so that's what I did.

I took some screen captures of the instructions for both, and you can compare at your leisure.


Pdf instructions are available on the Jalie website, here are the links:

While I think the Loulouxe assembly is simpler, the Multi-sport Skort instructions create a nicer finished product.  All in all the Loulouxe is a fantastic little skort!!

Thursday, April 27, 2017

What doesn't kill you may make you stronger, but it definitely tires you out

(Friends, I started writing this post in November, now it is almost May and I had completely forgotten about it.  For the sake of posterity, I will post it in its unfinished form--clearly my title was spot on!)

The PR Sewing Bee is over.  I was not the winner, and I was pretty down about it.  I knew after the 4th round entries were posted, I had some real competition, but I also felt that I was one of the top contenders.  Sigh.  Needless to say after 6 weeks of mad sewing (and in the case of Round #3, angry sewing) I was completely wiped out.   

Now that my Bee recovery is over and Halloween costumes are done, I can revisit my Round #4 entries.

The challenge was to make a Day to Night Outfit.  I made a lined jacket, a lined sheath dress, and a sequined bolero.

I used Butterick 5147 Lifestyle Wardrobe pattern for the jacket and dress.

Tuesday, October 4, 2016

It's not me, it's Rue: PR Sewing Bee Round 3

Friends, I will start this post with a Public Service Announcement:  Do not spend money on the Colette Rue Pattern.  Even if it was $1 instead of $18, don't do it!

I warned you that this round was a doozy and was it ever!!  The challenge was to make a garment using the Colette Rue dress pattern.  Ugh.  I don't like Colette patterns--they aren't drafted for someone with my body shape (pear) and my experience with the Hawthorn Dress left me with a wadder.  So I went into this round knowing it would be a lot of work.

Although I am very burnt out thinking about this dress, I will do my best to share my journey making this horrible pattern.  Upon the release of the Rue pattern Colette said they were returning to their roots-- meaning vintage inspired.  I am not on the vintage bandwagon.

I downloaded & the pattern (fyi I couldn't make it print properly using Windows 8) for version 2 with the straight skirt.  Even with the slimmer skirt it was 48 pages to print and assemble.  There was a lot of empty space around the pattern pieces, and as one Sewing Bee contestant wisely pointed out: the Colette Logo was large, dark, and on every page which used up a lot of ink.  Lots of paper, lots of taping, lots of ink wasted...it was only the beginning.

Once the pattern was assembled it was obvious from the bodice piece that I was going to be reinventing the wheel. Let's begin our photographic journey on this 'Rue' (little pun for the French speakers out there).

 I printed out sizes 12, 14, & 16 using the layers in the pdf file.  The ability to print only the sizes you want are the best part of this pattern.  I cut out the size 12 for the bodice through the waist., based on my full bust/waist measurements of 40/33.  For reference, the pattern suggested a size 12 for measurements of 40/32 (close enough even though I knew they draft for a C cup).  I taped up the tucks in the paper pattern and pinned it to my dress form:


The shoulders were way too wide.  I narrowed them by an inch by folding the paper and, then held it up to me:


The shoulder width was better but that thing didn't come anywhere near the tops of my shoulders!  Forget about the seam line--the cutting line was way too short.  I had the armhole in the right spot, the CF was in the right spot, the tucks released in the general vicinity of where they should, but the shoulders were 2" too short.  I am not a tall person & I do not have a long torso... That is a very strange block Colette is using.  Let's look at the pattern piece on my dress form:


Yup, 2" too short.  You can see I drew in the seam line on the paper, and for the seam to hit my shoulder line, I needed to add 2 full inches.  So I cut and spread the pattern piece above the armhole and added over 2", better too much than not enough.  Then I raised the neckline up 2" to bring it back up where it was supposed to be.

At that point, I made my first muslin of the front bodice: aka "Big Ugly Mess"


That is not a pretty silhouette
Pretty ugly right?  So I pinned out a bunch of the excess in the center front and pinned the side panels up where they would lay smoothly.


 You can see progress being made.  In addition to pinning the side panel upward, I also pinched a dart out of the armhole.  I rotated this dart out of the pattern piece.  I felt that the tucks at the bust were not located correctly.  They were pointing toward my sternum rather than to the apex.  I wanted to experiment with shifting them upward along the seam.

There was definite progress, so I charged ahead with muslin #2.

I want everyone to note that there is no bust apex marked on the pattern.  For a pattern with so much detail on the bodice, the designed bust apex location should be marked, not left open for interpretation.  

I cannot stress how much it annoyed me to have to figure out where the bust should be in this bodice.  Based on the number of "tester" versions shown right here on Colette's blog there are a variety of locations for that bodice seam.  Some are over the bust, mushing it down, others are lower, and not mushing so much.  This variation in the locations of that seam should be a huge red flag.

Then there is Sarai's dark plaid version, which I think is very pretty, I even like the plaid. (The sleeves look like they are pulling terribly across her shoulders though). If you read through the comments, she attributes the final location of that bodice seam being below her bust as a result of her fabric stretching and the FBA she did.  Riiiight....It was a just a happy accident.   Good one.

So Muslin #2:

I did not like the tucks in their updated location either, so I changed them to gathers, and spread the gathering out across my curves.  The lower bodice piece was flaring outward, so I took a small vertical tuck in it.

During this time there was a tremendous amount of grumbling on my part. My husband asked what I had planned for the day and I'd respond with some variation of: "I'm going to work on that horrible dress."

At this point, I was finally ready to look at the back of the dress.  I knew the front was going to require the most work, so I did that first.  I tissue fit the pattern piece to my dress form:

  
I knew I would need to narrow the shoulders, and add length above the armhole to match the front.  I wanted to raise the back neckline as well to suit my personal preference.  The tissue fit was not terrible.  I did take a small swayback adjustment which is standard (YAY A STANDARD ALTERATION!!) for me.  I also have a very erect back.  The back darts were very wide (2") and meant for someone with a curvier back than mine.  I made them half as wide as designed, ending with a 1" final dart take-up.  After adding all of the extra length in the upper bodice and upper back, I needed to raise the back armhole up 1.25", and then reshaped the armhole to fit me.


After all of the adjustments made to the armscye, I knew the original sleeve would never ever fit.  I had absolutely no desire to redraft a sleeve from scratch, and my fabric was lightweight and summery, so my dress became sleeveless.

But wait...there is a skirt too!  I planned on making the version 2 skirt which would require less fabric (not to mention less printer paper, ink, and taping time).  The skirt is flared and the front has small gathers instead of darts.  I didn't like the dichotomy of having stupid bust tucks on the bodice and silly gathers on the skirt.  The skirt back had no darts at all, only flare.  Speaking as someone who does not possess the 'flat butt' that the Colette block is drafted for, I was suspicious of the entire Rue skirt.

Back in November of 2014, I participated in the first PR Sewing Bee.  The first round was to make an A line skirt.  I modified my trusty McCalls 3830 pencil skirt pattern into an A-line skirt.  I pulled this pattern out and compared it to the Rue.  As I was comparing, I realized that I had already reinvented the wheel on this pattern so why not just use my own pattern for the skirt.  Boom.  Done.  I did think that the skirt needed a little more volume in the front, so I added 6" across the front of the skirt and made an inverted box pleat.  The sharpness of the pleat at the center front was more pleasing to me than any gathers or darts would be.  The pleat would also align nicely with the seaming at the bodice.

I shortened the skirt, since I am only 5'-2", and omitted the pockets.  I didn't want any extra fabric visible through my lightweight fabric.

The fabric was purchased in India in 2012 during my huge, pre-departure shopping spree.  It was a lightweight cotton, and could not have cost more than $1.60 a yard.  I also had over 3 meters of it, so it was a good choice for this dress.  I could goof something up and still have some fabric leftover to re-cut.  The lining was a white poly-crepe, also purchased in India, as well as my invisible zipper.

At this point I made muslin #3, with the skirt.  In the words of my husband, (I quote) "That's not a very flattering dress, you look like a Quaker."  I guess he didn't recognize my muslin fabric as one of our old bed sheets!  My enthusiasm for this dress is clearly expressed in the expression on my face.  (Har Har)


I had a few tweaks here and there in order to align the side seams of the bodice and the skirt.  I sewed the shoulders up last (and on the outside) so that I could adjust them as needed on the muslin and then transfer the marks to the pattern.  I was pretty sick of this thing by this point and felt there was nothing to lose by forging on ahead with my actual fabric.

I threw away the lining pattern pieces.  After 3 muslins worth of changes, they weren't good for anything except scrap paper.  I cut my lining pieces from the bodice pattern pieces and trimmed the neckline and armscye by 1/8" to allow for turn of the cloth.  I used The Slapdash Sewist's tutorials on how do an all machine, clean finish bodice lining, and how to do an all machine stitched lining insertion for invisible zippers.

Once I had the bodice lining finished, I put the bodice on my dress form to see how it looked.  It needed something.  I did a risky thing and in this case, my risk paid off.  I changed the round neckline to a sweetheart shape instead.  I felt that the sweetheart shape would mimic the shape of the bodice seaming in an attractive way.  It did.  To play up the neckline and bodice seaming even more, I added 1/8" black grosgrain ribbon to both areas.


Once the neckline was done, I attached the skirt lining to the bodice lining, and the entire lining to the invisible zipper.  Then hemming and done.  Easy.

I do like the final dress.  It fits, it is flattering, but there is very little of Colette's original pattern in it.  There were major front bodice alterations, alterations on the back darts and neckline, and my own A line skirt pattern.  It hardly qualifies as a Colette pattern anymore.

Here are photos:


I am happy to report that my Quasi-Colette Rue dress has advanced me into Round #4 of the PR Sewing Bee.  I am also happy to report that Colette Patterns have removed the Rue from their pattern store and are working on fixes to the "drafting problems"
We are correcting some drafting issues on the Rue pattern and altering the design according to your feedback. Along with corrections to the armscye and sleeve that will improve fitting issues, we will adjust the bust of the pattern so that the style lines fit fully underneath the bust.
"According to our feedback??"  Didn't they test this pattern before printing it??  There are too many head shaking questions to pose.  I'm worn out talking about this terrible pattern.  Friends...Save your money.  Friends don't let friends buy the Rue dress.  (mic drop)
  

Wednesday, September 28, 2016

PR Sewing Bee Round #2: A Bias skirt

I was in my (parked) car when I read the email from Pattern Review revealing the challenge for round #2: Make a Bias Garment.  I didn't cheer, I didn't groan, my reaction was more of a "Hmmm..."  Since I was already in the car out and about, I headed over to Joanns to peruse the pattern catalogs. McCall's patterns were on sale that day and I was hoping to find one of their patterns that would be interesting and which would work.  Nope.  Simplicity/Butterick/Vogue? Nope, nope nope.  I did find a New Look pattern, for a slinky dress, but when I pulled the envelope out of the drawer it said it was a juniors pattern!!  Nope.  Deflated, I realized I would never wear a slinky bias dress, so it was better that I not waste my time.

Then I went where I had never gone before...to Burda.  Right away I knew I would be able to find something that would work.  Their patterns were interesting and different.  There were different styles and interesting seamlines.  I know there are a number of sewists/bloggers out there who love Burda, but I've never had a need.  I do own 4 Burda Style Magazines but have never made anything out of them.  I found 2 great patterns for bias skirts, but the one that won out was Burda 6572.

I meandered through Joann's and found what they called brushed cotton windowpane plaid in black and red.  It was perfect! I love black and red together, it would look great on the bias, and it would be much easier to match than a more complex plaid.  

There is really interesting seaming on this skirt.  The front and back are on the bias, the back yoke is on grain, there is a front yoke and pocket that look different altogether.  The top of the pocket lines up exactly with the back yoke and I wanted to highlight that cool continuous looking line using dark red piping.


The red piping looks like it is continuous around the side and back of the skirt. It also provides a visual break between the skirt back, which is cut on the bias, and the back yoke, which is not. I was very concerned about the thickness of the piping at the CB seam and invisible zipper. Invisible zippers don't like bulk, so I discovered a clever idea to keep my piping but to make my zipper happy. I was able to slide the cord (inside the piping) out of the covering and cut 5/8" of it off. I then slid the cord back inside the covering and voila! no bulky cord at the seamline! I did this on the side seams as well. 


The hardest part about making this skirt was dealing with the bias, both in layout/cutting, and sewing so that the seams didn't stretch out.
#1: Cutting out the pattern pieces and making sure the plaid was on the grain lines. The flannel was very pliable and would shift easily off grain. On my pattern pieces for the front and back, I drew extra grainlines that would line up with the windowpane pattern on the fabric. Starting in the center of the pattern piece, I folded the pattern, placed it on the fabric aligning my grainlines with the red lines in the fabric and pinned in it place. Working from the center outward, I continued folding the pattern, aligning the fabric, and pinning it in place. It was tedious and time consuming, but to me (and my perfectionist tendencies) it was necessary.


 #2: Making sure seams didn't stretch out or skew before sewing. In order to prevent the curved seam line around the front yoke/pocket from stretching out or shifting while sewing, I used small strips of fusible interfacing along the concave curve on the front skirt piece. I was worried that manipulating the fabric and sewing this curve would stretch out the fabric and make my seams pucker. I also hand basted the pocket/front yoke to the skirt front, then machine basted, and then did a final stitch to make sure the curves laid flat. I also used strips of fusible interfacing at the center back where the zipper was installed to stabilize the seam prior to sewing in the zipper.  At the center front, where the bias front piece is sewn to the inner facing, I sewed a strip of 1/8" twill tape along the seam to be absolutely sure it didn't stretch out.

Here are the final photos:


I am once again happy to report that I have advance on to PR Sewing Bee Round #3.  --It's a doozy!


Thurlow Shorts! PR Sewing Bee Round #1

Long ago, I made a pair of Sewaholic Thurlow shorts.  They were not great:


I thought I'd still wear them but I never did.  I thought I had donated them before I moved.  Lo and behold, I found them in my refashion bin and was able to assess what went wrong last time.

I have put on a little weight since I made the first pair and they were a little small in the hips.  The waistband also fell on an odd spot which made my stomach poof out over the top.  No good.  I started my new attempt by cutting a muslin one size larger, a 14.  I raised the front 1", and I raised the center back up 3/4" increasing to 1" at the side seams to match the front.  The fit was good through the hips but very large at the waist.  I needed to take it in quite a bit at the center back seam.   Rather than just adjusting the center back seam, I took a little off  the side seams at the waistline and about 1/2" off at the center back.  I didn't want the back pockets to appear too close to the center seam so I shifted them and the back dart outward by 1/2".


I am not a fan of double welt pockets.  They look like lips to me.  Not the look I'm going for for my back pockets.  So I switched them to single welt pockets.  I used this excellent tutorial by poppykettle to make for single welt pockets.


When I first had them assembled, there were some butt-flossing issues in the back.

I scooped out the CB seam at the seat and it made a big difference.  I've never had to do this adjustment before, and was very happy with the result.


Seriously...that is a great view.

See?  Impressive!

One thing I did with these shorts that was unusual for me was to hem them much shorter than I normally do.  I was talking with a friend who has a similar shape as me, (although she is MUCH taller) and she told me that a stylist once told her to wear shorter shorts. That gave me the confidence to hem these with a 3.5" inseam rather than my typical 9".  I really like how it looks and I feel young!


Apart from scooping out the CB seam and raising the waisband, I made only minor changes.  I cut a size 14 with a slight decrease at the waist and a slight adjustment on the front pieces for athletic thighs. 

I skipped the belt loops...one reason I sew is to have bottoms that fit--no belt needed.

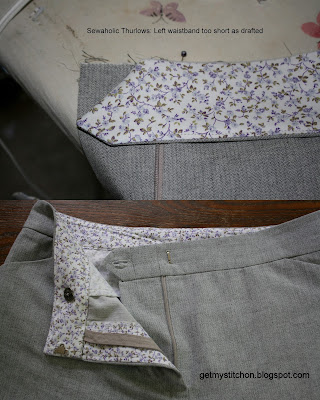
A note to future Thurlow sewists:  check the length of the left waistband. Mine was about 1.25" too short.  The pointed end of my waistband did not cover the entire fly extension. Some online research revealed that this has happened to other people as well. I didn't have enough of the gray denim to cut a new waistband on the correct grain-line, so I had to be creative. I wanted the pointed end of the waistband to completely cover the fly extension. I cut my waistband just to the inside of the zipper and cut a small piece of denim 1.75" long and the width of the waistband and waistband facing. I used 1/4" seam allowances to sew this piece to the main waistband and also to the pointed end. I pressed the seams open to minimize bulk. This little extension stays hidden behind the front closure.  Not everyone has has this issue but there are definitely some of us.  Save yourself a headache and measure the waistband and compare it to the left front, back, and fly extension.


  I am happy to report that I made it on to Round #2 in the Sewing Bee with these Thurlows!
Related Posts Plugin for WordPress, Blogger...